Tuesday, October 11, 2011

Install Windows with a bootable live USB drive configured in Linux.

Once I came across this requirement where I had to install Windows in one of my computers without having to use any CD/DVD.(since my DVD drive was stolen by one of my colleagues. :P). So the idea was to create a bootable live USB drive to get my task done. Oh Crap!! I was using Ubuntu in my other computer so I had to find a way to configure my thumb drive to be able to use it in the installation process. That's where Unetbootin (an awesome piece of software by which we could easily configure a USB drive as a live bootable device) came for the rescue. 

This blog post intends to walk you through the process of installing UNetbootin, configuring your USB drive using Unetbootin and finally using it to install Windows in your machine.

Environment:
Ubuntu 10.04 Lucid Linux
Unetbootin 408-1

Note: Please note that the version of the Unetbootin mentioned above is not the latest one. But I prefer you use this particular version as I was confronted with a couple of issues with the latest version (Unetbootin-linux-555) such as my USB drive was not listed under the mounted USB drive list, etc.

Let's get Unetbootin running first..

There are obviously two methods that you could use to get Unetbootin running on Ubuntu. 
1. Use the executable downloaded from their official site.
2. Use apt-get to install it and select "Applications > System Tools > Unetbootin"

Let's first have a look at how you could install it with the most simplest method (involving lesser number of steps ;)), which is the first one out of the aforementioned options.

Use the executable.
Step 1: 
Download the executable from here.

Step 2: 
If the executable does not possess the necessary permissions to be executed, modify the permissions of it by running "$chmod 755 unetbootin-xxx". ("xxx" refers to the version)

Step 3: 
Then run the executable which will pop up its UI.

Install with apt-get and select the relevant item from the main menu.
Step 1: 
Go to then terminal and execute the following batch of commands which will install Unetbootin at the completion of its successful execution.

sudo add-apt-repository ppa:gezakovacs/ppa
sudo apt-get update
sudo apt-get install unetbootin

Step 2: 
Then go to "Applications > System Tools" and select Unetbootin from the menu.

With that you're now basically done with installing Unetbootin in your machine.

Next, configure the USB drive as a live bootable device to install Windows with an ISO image of WindowsXP...


As depicted in the above image,

Step 1: 
Select "Disk image" option which can be located at the latter half of the UI and select the path to your ISO image.

Step 2: 
Then tick the "Select All Devices" option to list out all the available devices that are already mounted.

Step 3: 
Next, select the "Type" of the drive as "USB" and further select the mount point of your USB drive from the drop down box named "Drive".

Step 4: 
Finally, click on the "OK" button which will take you to the completion of the process.

Hurray!!! We're done with configuring the the USB. 


Finally, install Windows with the USB drive configured in the previous step...

Step 1: 
Plug in your USB drive to the machine that you need to install Windows into. 

Step 2: 
Make sure the boot order is properly configured for the machine to get boot up using the USB device.

Step 3: 
Follow the usual process of installing Windows.

Step 4: 
Ding dong! Now it's time to play with Windows.. ;)


Friday, September 23, 2011

Export registry contents of one carbon node to another using WSO2 Greg check-in client

Overview

WSO2 governance registry can be introduced as a product which provides you with a rich set of functionalities to accomplish your registry and repository related needs. Including WSO2 Greg, each and every carbon based product uses the registry kernel which offers basic registry and repository functionalities to store data and configurations associated with each product. For example, it's being often used to store various resource entities such as carbon datasource configurations, WSDLs, Schemas, endpoints, etc under various environments such as standalone environments, clustered environments etc in numerous  occasions.

Delving further into the functionality of the registry kernel, its storage space can be divided into three main partitions namely,
1. Local registry
2. Configuration registry
3. Governance registry

Out of those three aforementioned types of partitions, local registry is often used to store configurations and data that are local to a particular instance of a carbon product. Also this particular registry space is not shared among any other nodes by its nature. In contrast, the configuration registry can be used to share configurations common to multiple nodes of the same product. For example, if you consider a cluster of WSO2 Data Service Server nodes storing dbs files or any other configuration data in their configuration registry space, those data can be shared across all the nodes in the WSO2 Data Service Server cluster. Unlike both local registry and configuration registry, the governance registry can be used to store configurations and data that need to be shared across many nodes of different carbon products.

Back to the topic..

Having had a brief, yet comprehensive overview about the registry kernal, let's get ourselves back to the main subject of this blog post which is exporting registry contents of one carbon node to another using the check-in client introduced by WSO2 Governance Registry.

As explained earlier, you may come across this requirement of migrating or exporting data and configurations stored in the registry of one carbon product to another. One way of achieving this would be to get a database dump and restore it in the carbon node that exists in the other end of the migration process which is a pretty much tedious task. To address this problem, WSO2 Governance Registry introduces this mechanism called registry check-in client which provides you with means to get a registry dump and restore it in another  carbon node easily. Although this mechanism is only shipped with WSO2 Governance Registry by default, it's quite possible to adopt it into other carbon products as well. The rest of the content of this blog post would bring you the steps that are necessary in making use of the registry check-in client in other carbon products (For example, WSO2 Data Services Server).

Step 1:
Download WSO2 Governance Registry distribution and locate the checkin-client.sh in its GREG_HOME/bin directory.

Step 2:
Change the working directory to DSS_HOME/bin and place the checkin-client.sh there.

Step 3:
Execute "ant" command inside DSS_HOME/bin directory which would create the DSS_HOME/repository/lib directory (if it does not already exist) and copy some required dependency jars to that particular directory.

Step 4:
Change the working directory to GREG_HOME/repository/lib and locate checkin-client-x.x.x.jar (x.x.x represents the version of the product being used)

Step 5:
Change the working directory back to DSS_HOME/repository/lib and place checkin-client-x.x.x.jar there.

Step 6:
Restart WSO2 Data Service Server instance.

Step 7:
Change the working directory to DSS_HOME/bin in the command line and run the checkout command "checkin-client.sh co https://hostname:9443/registry/ -u admin -p admin -f registry_checkout". This will create a registry dump file of the root collection, called "registry_checkout" inside DSS_HOME/bin directory. (Modify the paths and the hostname to match your environment)

Step 8:
To check in the data to a different DSS node (or any other carbon node), execute the following command. "./checkin-client.sh ci https://hostname:9443/registry/ -u admin -p admin -f $DSS_HOME/bin/registry_checkout". (Modify the paths and hostname to match your environment)

Further information on various ways of obtaining a registry dump of a particular collection can be located at [1].


References:

Thursday, September 1, 2011

How secure your data in the cloud?

It's been not so long since the concept of cloud computing started emerging. But the huge hype it has generated within such a short period of time suggests the amount of interest people have already gotten at it. And yes, it has to be of such strength to make such a solid impression on world-wide technical experts, that quickly. The business advantages may have been the reason for most organizations to adapt the cloud or it could be the huge hype which forced them towards the adaption. However, it's not quite clear how many of them have really thought about the pros and cons of it and made the best suited solutions for their organizations. This article is intended to provide an insight into some of the risks that are associated with the cloud which may be hidden yet important to be mindful of, within the scope of data.

First and the foremost, have you or your business organization ever thought about how secure your data to be stored in some storage space offered to you by your cloud service provider and located at some unseen data center? In other words, your cloud service provider may have its data distributed in several data centers established in various parts of the world. To which content do they provide a guarantee on the security of your data (maybe sensitive or maybe not) stored in such geographically parted locations? If you've ever thought about the data security, these questions would have naturally come up to your mind. To  address this concern, some cloud service providers are now in the process of offering encrypted data storage mechanisms restricting the room for any security vulnerabilities. But that too has got some bad implications like performance bottlenecks, etc which would reduce the performance and other measurements of the data manipulative processes associated with the business.

Another important concern would be, the various laws, rules and regulations and acts that are imposed upon data by different countries. For example, if your cloud service provider is based on some European country and if you, as the service consumer, are located at some Asian country, the variations of such laws imposed on data may restrict you from manipulating your own data freely according to your real requirements. Though this risk is not clearly visible, it can be of such high impact on the legality of your business.

For highly data intensive businesses, the high availability of data plays a vital role. Thus, for such businesses that have gotten themselves into the cloud must have a strong guarantee from the service provider that the high availability is constantly ensured. The recent power outages took place in Amazon, one of the popular service providers in the cloud space, is one of the best examples to show how risky it could be, if it's not handled properly. Most of the time this type of service interruptions due to Power outages, natural disasters, etc take place unexpectedly. Yet it is a must that the cloud service provider has the ability to mitigate such risks and provide the service consumers with an uninterrupted service. On the other hand, there should be a guarantee on the time that the service provider would  take in order to restore the system back to normal conditions. Not only that, in case of a natural disaster, the cloud service provider should have the ability to recover your data from any data loss that could possibly occur.

These would be somewhat obvious questions if you are really mindful about the data security. Yet, it is always important that all individuals and organizations who are into cloud, take them into account if they're to select the best suited cloud service provider for their business in terms of data.

Nowadays, most of the people who are dealing with sensitive data manipulative activities and concerned about data security, thus, prefer the concept of private cloud ahead of the services offered by the public cloud in which they can have the total control over each and every aspect of the data manipulations that are involved in their business activities. The good news is that, WSO2 offers its private cloud solutions (apart from its public cloud solutions) to help such people get going with their business who are doubtful about the data security, which enables the users to obtain the complete control over their data manipulative needs. Further, WSO2's private cloud offerings too expose you to its complete product stack as-Services including Data-as-a-Service, ESB-as-a-Service, etc. Visit wso2.org or wso2.com for more details, tutorials and articles which would provide you with a comprehensive understanding about WSO2's cloud offerings and how you can adapt them into your businesses.

Tuesday, August 30, 2011

Data Federation With WSO2 Data Service Server

What's Data?

If you're asked the question "What's Data?", what could possibly be your answer? Though it's somewhat a confusing question to answer, I would call data as a form of representing knowledge, experience, observations, statistics, facts, concepts, etc that could further be formatted or presented in an orderly manner to be used in decision making, pattern identification, etc. As per the definition given to it, it's clear that data could be one of the most obvious things out of the stuff that we deal with, in our day to day life and it also implies the fact that every bit of moment that we spend in our lives can be converted into some form of data.

Though the term "data" has such a generic meaning, we often use it to refer a small subset of data which is constrained by some context associated with it. For example, if we consider some organization engaged in some form of a business, that particular organization would mostly be interested in "data" related to the context of the business that they are involved in. Not only the organizations but also the individuals, applications and various other entities spanned across the world amass data of their own contexts to analyse and find certain patterns, keep track of the older activities, or do whatever the tasks they are interested in carrying out. There comes the need of having a mechanism to store those data in a meaningful manner together with the ease of access. The myriad data storage mechanisms ranging from Relational Database Management Systems to NoSQL databases, data ware houses, legacy systems, document repositories, google and Excel spreadsheets, CSV, etc which are currently available in the world, were originated to cater that requirement. And almost all the enterprise bodies use  one or a combination of the aforementioned data storage mechanisms to fulfill their various data manipulation needs.

What's Data Federation?

As the term itself implies, Data Federation usually refers to the integration of data scattered across numerous types of data sources into some sort of form which makes it easy to access. Before the introduction of the concept of Data Federation, the most commonly used practice was to, first copy the relevant data into some other additional storage space and then carry out the integration based on the previously described copied chunk of data. But the bottlenecks encountered while doing so, such as copyright infringements when copying data, the need of additional storage space, led the way out to find better alternatives that possess the potential to avoid such bottlenecks. Among such alternatives, the concept of Data Federation could be considered the most advanced and efficient solution which makes it possible for various organizations to collect and process data scattered across their various data sources efficiently.

How does the WSO2 DSS fit in?


If we delve into the enterprise data solutions that are currently available in the market which offers its users with Data Federation functionality, WSO2 Data Services Server comes handy with its capabilities over the Data Federation as it supports a wide range of data source types to be federated varying from Relational Database Management Systems (RDBMS) such as Mysql, Oracle, MSSql, Postgres, H2, Derby to tabular data sources such as Google Spread Sheets, Excel Spread Sheets, CSV, etc. In WSO2 Data Services Server, the users are provided with the functionality of manipulating data stored in multiple types of data sources and present them to the user with an unified format.

In WSO2 DSS, this is implemented by using two main functionalities, namely,
1. Multiple data source support.
2. Nested query support.
3. Export parameter support.

1. Multiple data source support

Multiple data source support is another enticing feature available via WSO2 Data Services Server which enables users to define multiple database configurations within the same data-service descriptor. The following diagram depicts how it's done using a sample descriptor. There, each database configuration is given an id to uniquely identify the data source and this particular id will be later used in the process of integrating the data extracted out from various types of data sources together.

2. Nested Queries

Nested queries can also be considered another vital feature used in the process of data federation which carries out the real integration of the data queried from different types of data sources together. In other words, this makes it possible for a particular data service query to feed the result obtained after the execution of that particular query, as an input to some other query and eventually integrate both results to an unified format before presenting it to the user. The following diagram depicts the configurations of such sample data service queries and how they are integrated together to from a nested query which could be used in the process of data federation.

 3. Export parameter support

With this particular feature, the user is given the ability to export values of the output parameters of a particular query to be used in another query.


Having discussed about the bits and pieces of the Data Federation implementation of WSO2 DSS, let's delve into some practical use cases where you can actually make use of this feature in the real production environment.

Sample use cases:

Usecase 1: Let's consider a hypothetical usecase where a particular organization has the data related to its employees and offices in two RDBMSs' of the type MySQL and Oracle. further imagine the MySQL database contains a table named "Employee" and the Oracle database contains a table named "Office" to store the relevant data. Here,  the user needs to present both those data sets queried from different databases merged as a list of offices which nests its employees under each listed office.

Usecase 2: Assume a particular user has some data stored in the form of CSV files and he needs to get those data exported into a MySQL database.

Download the WSO2 Data Service Server and try those samples yourself!

Monday, August 22, 2011

WSO2 unveils its Relational Storage Solutions via WSO2 StratosLive.

Introduction

Nowadays, The concept of cloud computing is becoming increasingly popular. Many of the businesses spanned across various parts of the globe tend to adapt the cloud as it offers various means to provide the customers with highly scalable, agile, flexible service offerings at low capital, operational and maintenance costs. As a result, the customer attraction towards the cloud services has been increasing over the last couple of years and that has been one of the key driving forces which lies behind the emergence of various vendors who provide Cloud based services.

Among such vendors, WSO2 is considered one of the strongest competitors in the cloud space, recently introducing WSO2 StratosLive, the most complete and innovative Paas(Platform as a Service) which comes as a composition of various services representing its own unique product stack comprising ESB-as-a-Service, Data-as-a-Service, etc, which are completely built upon WSO2 Carbon, the most comprehensive enterprise middleware platform introduced by WSO2.

WSO2 RSS (Relational Storage Service)

Almost all the applications irrespective of whether they are run on the cloud or as a piece of standalone application, have got the requirement of storing and manipulating data associated with their numerious operations. That in turn brings forward the need of having a proper storage solution which caters all such data related requirements of those applications. Although there are diverse set of options available for standalone applications to be used locally to store data, not many options provide such storage capabilities and easy access to those stored data in the cloud space. WSO2 Relational Storage Service(RSS) which comes as a part of WSO2's the most complete PaaS (Platform as a service) offering, StratosLive, is capable of fulfilling all such data related requirements of applications running on the cloud. This particular post mainly aims at providing the community with a comprehensive understanding about WSO2 RSS and its offerings.

Delving into the storage solutions offered by WSO2 RSS, it gives you the total control over your data storage space, absolutely FREE of charge, by allowing you to create and manage your data storage space on your own via an easy to use user-interface. The users are completely given the ability to make their choice out of the two below mentioned options depending on the requirements.

1. Create and manage their data storage space within the WSO2 RSS.

2. Add user-defined RDS instances and manage them using WSO2 Data-as-a-Service user interface.

WSO2 RSS is implemented based on Amazon Relational Data Storage(RDS) System. Thus it inherits all the benefits offered by the Amazon RDS which could be thought of as an added advantage.

Having had a good insight into the storage solutions offered by WSO2 Data-as-a-Service, let's further explore how you can actually implement each of those aforementioned solutions with WSO2 RSS.

* Creating and managing your databases within WSO2 RSS.

Now, let's look at how we can create a database and perform related tasks such as creating database users and assigning them to databases, creating carbon datasources and dataservices using those databases, etc.

Step 1: Creating your database within the WSO2 RSS.

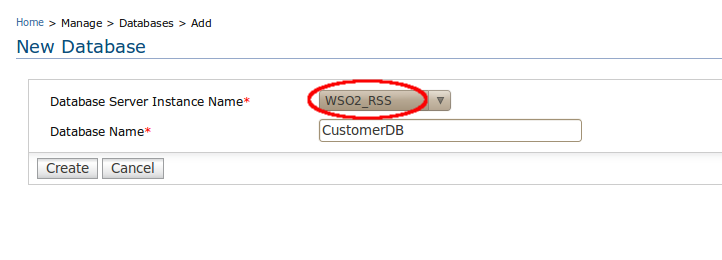
The first step in the process of consuming WSO2 Relational Storage Service is to create a database for your application in the WSO2 RSS storage space. As the figure below depicts, the WSO2_RSS option together with the set of your own RDS instances that are configured to be used to manipulate your application data, will be listed out in the select box which carries the label "Database Server Instance Name". There you can either use WSO2 Relational Storage Service or your own RDS instances to create and consume your database. Once you select your preferred storage solution, you can then proceed with the creation of your database. The user is given the ability to specify a preferred name for the database under "Database Name". Once you click on the create button after fulfilling the aforementioned requirements, you will be able to create the database of your own choice to store the application data manipulated within your own domain.

Having created a database, let's delve into how you can create database users and assign them to the database created in the first-most step of the process.

Before we create such database users upon a particular database, we introduce the concept of database privilege groups which allow you to create a group of database privileges that are intended to grant a particular database user and then reuse that group of privileges to create users which would considerably reduce the time associated with that task. It is interesting to explore how we can create such privilege groups before we move towards our main task of creating database users.

Step 2: Creating permission templates to be assigned to database users.

In this step, the users are given contorol over coming up with their own permission schemes that will be granted to their database users later. As the figure below shows, it's simply a matter of selecting the permission just by clicking on the check boxes associated with a particular database permission which helps you avoid tedious tasks such as writing lengthy SQL queries and executing them to grant database privileges for a particular database user.

Once you are done creating a privilege group, it will be listed out in the page titled "Database user privilege groups" as shown in figure below.
After creating privilege groups, then use them in creating database users. This is discussed in step 3.
Step 3: Creating database users and attaching them to the created database.

The "Add new user" user interface allows you to specify a name and a password of your choice for a particular user. It also lists down the prvilege groups that you created under step 1 so that you can select the appropriate permission scheme which is intended to grant the database user. Once you successfully fulfil the above requirements and click the save button which can be located at the bottom of the image, a database user will be created to be used in the data manipulative tasks carried out in your tenant domain.
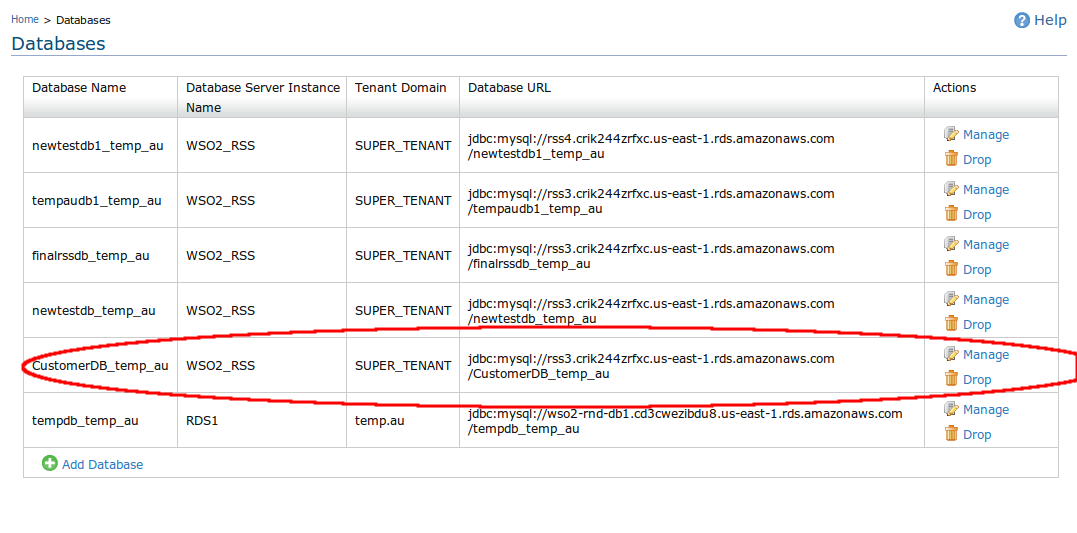
At the successful completion of the aforementioned task, you will be able to observe the database user that you've just created in the "Database Users" page as depicted in the figure below. Now you can use this user to carryout various database related tasks such as exploring the databases and configuring it with using your own schemas, creating carbon datasources to be used in the process of creating dataservices, etc.
Step 4: Configuring your database with your own schemas, etc.

Having successfully created a database and attached a database user, you now need to configure your database so that it suits your own requirements. This task is also made quite simple with the database explorer that we've integrated into the database management user interface by which you can execute your desired SQL schemas to configure the database the way you prefer. To get you redirected to the database explorer, click on the "Explore Database" option listed under the "Actions" category in the "Database Users" page.
Next, you can execute your SQL scrips in the console given to you by the database explorer page and configure your database as described earlier.
Although we're almost done with our task, let us now discuss a couple of other enticing functionalities offered to you via the management console of the WSO2 Relational Storage Service.

Step 5: Creating carbon datasources pointing your databases.

Carbon Datasources play a vital role in carbon as it provides means to reuse relational database connections in various data manipulative tasks carried out across the platform. Thus, the create datasource option offered as an administrative action can be a handy feature whenever a user wishes to create such a carbon datasource out of the database which we've created in the earlier steps. Just clicking on the "Create Datasource" will get this task done for you in a matter of seconds.

Now, you can observe the entry corresponding to the carbon datasource created in the previous step if you browse the Data Sources option which comes under the Configure menu of the management user interface as shown below.

The "Generate" data service option that comes as a part of WSO2 Data Services Server can now be used to create a dataservice upon the datasource created in the previous step and deploy in absolutely no time. As it is shown in figure below, you can select the desired datasource out of the listed data sources, the appropriate database name that is given to you at the completion of creating a database and proceed with creating a dataservice and eventually deploy it.

Step 6: Creating data services using those created carbon datasources.

* Adding user-defined RDS instances and managing them using WSO2 DSS user interface.

WSO2 Relational Storage Service not only gives you the ability to use the storage space offered to you by the service itself, but also offers you the ability to use your own RDS instances to be used in your data manipulative activities. Let's investigate how to achieve that functionality via the user interface of the WSO2 Data Services Server.

Step 1: Add your own RDS instances.

In order to add your own RDS instances to the system, you can simply use the "Database Server Instance" option which can be loacated under the "Configure" menu of the management console. You can fill up the fields depenending on your preference and add your RDS instance to the system to be used as a data store for the applications running under your tenant domain.

Step 2: Create your database within the user defined RDS instance instead of using WSO2 RSS.

Once you're done adding your own RDS instance to the system, the rest of the process of creating databases and managing them is as same as described in step 1 of the previous category.
This way you can select your preferred data storage solution and continue experiencing the awesome set of functionalities provided by StratosLive, the most complete PaaS offered by WSO2.

Try StratosLive NOW!

Monday, June 13, 2011

WSO2 Data Services Server v2.6.0 Released!

WSO2 Data Services Server v2.6.0
12'th June 2011

WSO2 Data Services Server team is pleased to announce the release of version 2.6.0 of the WSO2 Data Services Server.

The WSO2 Data Services Server is an extremely simple and elegant mechanism to take data and make it available as a set of WS-* style Web services or as a set of REST style Web resources. It augments SOA development efforts by providing an easy to use platform for creating and hosting data services. This enables easy integration of data into business processes, mashups, gadgets, BI applications and any service in general.

What's new in v2.6.0?
  • UDT (User Defined Type) Support
  • Complex Results
  • Auto Generated Keys Support
  • Distributed Transactions
  • Improved Boxcarring Support
  • Improved Batch Request Support
  • Scheduled Tasks
  • Registry Integration for Excel,CSV,XSLT
  • Web Scraping Support
  • Multiple SQL Dialect Support
  • DB -> DS Generation
  • Data Service Query Improvements
  • Service Group/Hierarchy Support
  • Database Explorer
What else..

  • Support for large XML outputs
  • Content Filtering based on user's role
  • Support for named parameters
  • Mixing multiple data sources in nested queries
  • Oracle Ref Cursor support
  • Support for multiple data source types
  • Data validations
  • Clustering support for High Availability and High Scalability
  • Full support for WS-Security, WS-Trust, WS-Policy and WS-Secure Conversation and XKMS
  • JMX and Web interface based monitoring and management
  • WS-* and REST support
 

Where to download?
You can download WSO2 Data Services Server v2.6.0 from  http://wso2.org/downloads/data-services-server.

Tutorials:-
Check out the Data Services Server HOWTOs series (http://wso2.org/library/3183) on the WSO2s Oxygen Tank developer portal to learn more.
 
Known Issues:- 

How to get involved:-
Support:-
We are committed to ensuring that your enterprise middleware deployment is completely supported from evaluation to production. Our unique approach ensures that all support leverages our open development methodology, and is provided by the very same engineers who build the technology.
For more details and to take advantage of this unique opportunity, please visit  http://wso2.com/support/.

Thank you for your interest in WSO2 Data Services Server.

- WSO2 Data Services Server Team